ORC Week 6: Framing Around Basement Ductwork With Metal Studs
The end of the eight-week
One Room Challenge
is fast approaching. With only two weeks left to finish our laundry room by
the deadline, where do things stand? Well, we have a ceiling. Half a ceiling,
to be more precise.
If you're new to Rambling Renovators, welcome! My name is Jennifer. I
help people create functional and beautiful homes, I help brands create digital content strategies, and I've been writing
this blog since 2007. I live with my husband and daughter in Toronto,
Canada in a centre-plan, colonial style house that we've infused with the
fresh traditional style we love. We DIY all our renovations and have a
fondness for architectural details, built-ins, and classic decor. See our
home renovations
here.
Note: affiliate links have been used in this post for shopping convenience.
Last week, we reached a milestone by framing the walls. Finally, the laundry
room has started to look like a room, but we had no time to waste and
focused on our next task: framing the ceiling.
Framing Around Ductwork with Metal Studs
Let me preface this by saying that we've never framed a ceiling before. We
watched a few YouTube videos on the subject and quickly discovered that there
is no single right way to do this. From metal studs to wood studs, plywood to
OSB, you can use a variety of materials to frame a basement ceiling.
We researched our options, spoke to some of the experts at The Home Depot Canada (our partners on this project!) and decided on metal framing.
We decided to use
metal studs and metal framing trim
on the ceiling for several reasons:
- metal is lightweight and easier to work with overhead
- metal studs are slightly smaller than wood studs and can save us precious space with an already low ceiling
- metal studs don't warp, expand or contract like wood studs. They can keep your ceiling looking smoother
- its easier to work with and tuck in metal studs around awkward ducts and plumbing, thereby minimizing the size of your bulkheads
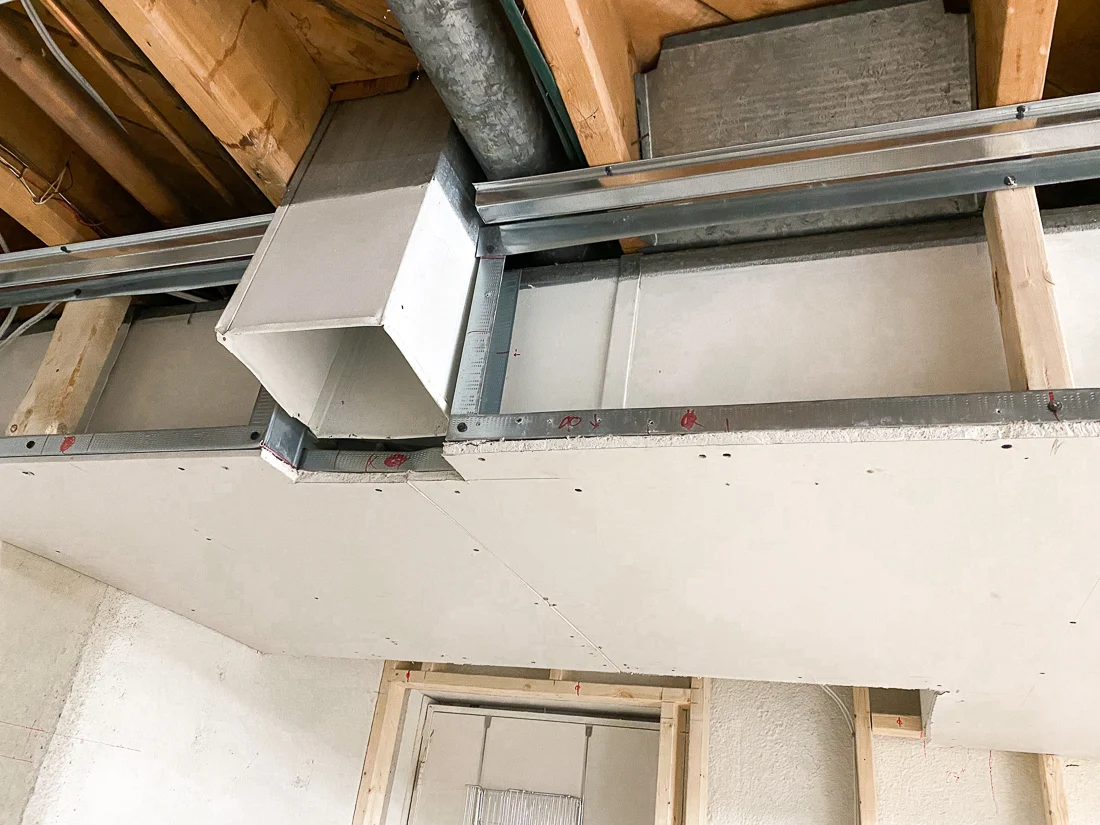
Our biggest challenge was framing around the ductwork that runs the length of
the laundry room. We decided to frame the ceiling by:
- creating ladders to sit on either side of the duct. The ladder was made using a framing track with the ends bent upwards 90 degrees to create a U-shaped structure with wood studs for the vertical posts
- cutouts were made along the ladder to hold the furring channels. These furring channels sit beneath the ductwork and provide a horizontal surface for the drywall to attach to
- L-shaped framing trim around the perimeter of the room to hold up the other end of the furring channels
As if that wasn't challenge enough, we had a laundry chute to contend with,
and three different ceiling heights.
The ceiling below the ductwork would be the lowest point. The area to the
left of the duct would raise back up full height to the floor joists above.
The area towards the door would raise up slightly. There was some low-lying
ducts in that area, but we had to raise the ceiling enough to allow for the
inward door swing.
Once the ceiling framing was complete, and the electrician completed his work,
we were able to start on the drywall.
I'll be the first to admit that drywall is not our strong suit. Picture me
standing at the top of a ladder, bracing a 4'x8' sheet of drywall overhead
like Atlas holding up the world, using my head, shoulders and hands to keep it
from crashing down while Sean scurries about trying to put in as many drywall
screws as he can.
That was as fun as it sounds.
We were frustrated by many things on the journey to get drywall on the
ceiling. The fact that the tight curve in our basement stairs made it almost
impossible to get sheets of drywall downstairs. The fact that we had been
using screws for wood studs instead of metal studs. The fact that we didn't
know our drill bit was stripped and that's why it wasn't turning the screws.
It isn't pretty but we have half of the room drywalled now. We are hoping
that taping and mudding will hide all of the imperfections. Sean hates
mudding and is already complaining about it but I'm eager to try. Who knows,
I might be good at it.
There is still lots to be done and not much time to complete it but I'm
excited. The hard work is just about finished! Head to the One Room Challenge blog to see how all the other participants are doing.


.png)
